A good pair of shears should feel secure and balanced in the hand. When the tool, the material, and your grip are properly matched, the cut feels controlled and less effort is wasted.
This guide covers two types of spring-loaded cutting tools: pruning shears and garden snips. Both use a return spring and share the same basic rhythm in the hand, although they are designed for different kinds of work—from cutting woody branches to trimming buds, soft stems, herbs, and plants in confined spaces.
I often speak with customers at trade shows, and I have noticed that many people wrap all four fingers around the handle of their pruning shears. However, extending the index finger while positioning the blades can make the blade tip easier to control and allow the wrist to move more naturally.
Using photographs, this guide introduces the basic grip that I find makes pruning shears easier to handle.
Before you start: Keep your free hand clear of the blades and the cutting line. Stay within the stated cutting capacity of your model, and never use two hands to force a one-handed tool closed.
How to hold pruning shears
Start with a relaxed, secure grip.
In the orientation shown below, let the palm-side handle rest against the base of your thumb, where the thumb meets the palm. Wrap your fingers naturally around the finger-side handle.
The tool should sit far enough into the hand to remain steady under a light grip, but not so deep that your fingers must stretch to operate it.
To close the blades, draw the finger-side handle toward your palm while the palm supports the opposite handle. Do not rely on one or two fingertips. A full-hand hold supports the tool and spreads the effort across the hand.
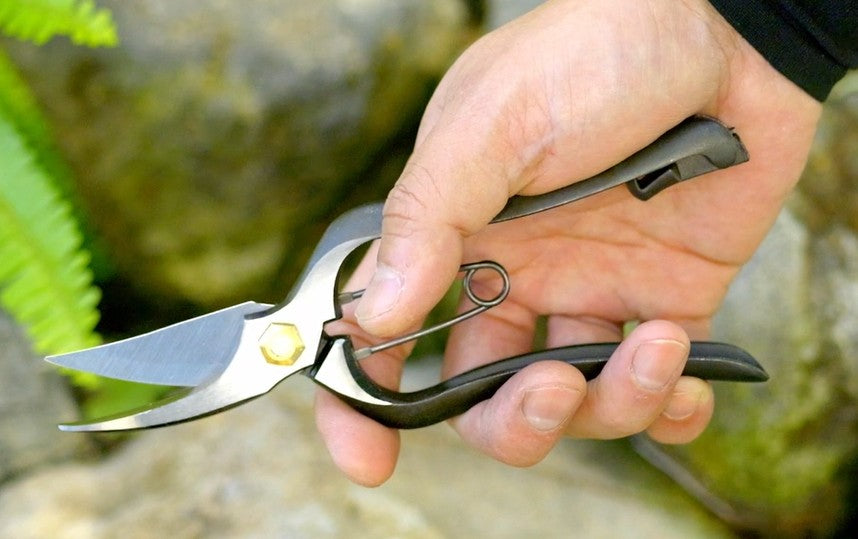
How you position your index finger is key to ease of use. Rather than gripping with all four fingers in the same way, extend your index finger and place it on the area marked by the red circle. This makes it easier to control the tip of the blade.


[Photo: T19 Multi-Purpose Pruning Shears. Cutting capacity: up to approx. 5 mm at the tip and approx. 10 mm at the base.]
Open. Position. Close. Release.
This is the basic rhythm of a controlled cut. Approach the stem or branch with the blades open. Position the blades at the exact point you intend to cut, and check that no other stem, leaf, or shoot is caught between them.
While positioning the blades, keeping your index finger extended makes it easier to control the blade tip.
Close your hand in one controlled motion. After the cut, release your grip and allow the spring to reopen the handles.
For a thicker branch that is still within the model’s cutting capacity, place it closer to the pivot rather than at the blade tip. This gives the shears greater mechanical advantage.
A sharp blade reduces unnecessary force; it does not remove the need for force entirely. A thicker branch still requires a firm, controlled squeeze.
When cutting a thicker branch, wrap all four fingers around the handle and squeeze firmly in one controlled motion.
If the branch will not cut with one controlled squeeze, stop. Reopen the blades and check the position of the branch. If the material is too thick or too hard for the tool, change to loppers or a pruning saw.
Never trap a branch between the blades and twist the handles sideways to force the cut. Shears are made to cut in one line, not to pry sideways. Lateral force can bend the blades, disturb their alignment, or place unnecessary strain on the pivot.
A small, natural adjustment of the wrist while positioning the blades is normal. Sideways force applied after the branch is trapped is not.


[Photo: T19 in Action.]
Why Forged Bypass Pruning Shears Feel Different
It is easy to squeeze pruning shears too hard, as if strength alone makes the cut.
On a well-made bypass pruner, a keen edge starts the cut and precise blade contact helps keep it controlled. Sharp, well-maintained blades reduce crushing and tearing, but correct blade placement matters just as much.
Where that blade contact comes from
The forged Toyama Hamono pruning shears featured in this article are made in Sanjo, Niigata, where five generations of the Toyama family have produced shears since 1861.
On selected Toyama Hamono models, the inner face of the cutting blade has a shallow hollow known as ura-suki. The two blades are then matched by hand to create the intended line of contact.
How ergonomic grips support the hold

[Photo: asymmetrical ergonomic grip, Standard grip, and symmetrical ergonomic grip.]
Some models use shaped grips to make a stable hand position easier to find and repeat. The grip shape does not change the basic cutting motion.
A symmetrical ergonomic grip adds shaped contact points for the fingers and palm while preserving more freedom to change the orientation of the hand.


[Photo: T21 pruning shears with symmetrical ergonomic grip.]
An asymmetrical ergonomic grip gives the hand a more clearly defined orientation. The thumb side and little-finger side are shaped differently, indicating how the tool is intended to sit in the hand.


[Photo: T25 pruning shears with asymmetrical ergonomic grip.]
Check the stated handedness of the individual model. Dedicated left-handed versions are available for selected models.
Regardless of grip shape, keep the hand relaxed while positioning the blades and apply firm pressure only during the cut.
[Photo: Standard symmetrical, symmetrical ergonomic, and asymmetrical ergonomic grips held by the same person at the same angle. Identify each model and its handedness in the caption.]
Spring-loaded garden snips need an even lighter touch
Spring-loaded garden snips use the same return-spring mechanism, but their slimmer blades are designed for more delicate work. Typical tasks include deadheading, thinning shoots, harvesting herbs, tidying houseplants, and making detail cuts among crowded stems.
Hold snips more lightly than pruning shears.
The objective is accuracy, not power. Guide the narrow blade tip to the exact stem you intend to cut. Keep the tip visible, and confirm that no nearby leaf, bud, or stem is between the blades before closing them.
Do not treat garden snips as miniature pruning shears. If a stem is too thick or hard to cut comfortably, change tools rather than squeezing harder or twisting the blade tips.


[Photo: T-17 Snips with standard grip.]
Keep the blade clean and the pivot moving smoothly
Clean blades and a smooth pivot help the tool move as intended.
After use, wipe sap and plant residue from the blades, keep the tool dry, and follow the care instructions for the individual model.
If the movement begins to catch or feel unusually tight, stop and inspect the pivot rather than forcing the handles.
[Link: How to Care for Japanese Pruning Shears.]
Quick safety check
Before cutting:
-
Check that the blades, spring, pivot, and safety lock—where fitted—are in good working order.
-
Keep your free hand clear of the blades and the cutting line.
-
Position the blades before applying pressure.
-
Never use closed blades as a lever.
-
Never force the handles sideways against trapped material.
-
Never use two hands to close a one-handed tool.
-
Change to a larger tool when the material exceeds the stated cutting capacity.
Material warning: Unless the individual model specifically permits it, do not use these shears on wire, plastic, artificial stems, bamboo, very dry wood, or hard frozen branches.
Always follow the intended materials, cutting capacity, handedness, and care instructions provided for the individual model.
Share:
Best Pruning Shears for Small Hands: A Practical Size and Fit Guide